iPhone Real Estate Photography: Pro Results on a Budget (2025)
You don't need a $3,000 camera to create scroll-stopping listing photos. Here's how top agents use their iPhone to capture professional-quality images—and the editing secrets that make them shine.
355Lab Team
December 30, 2025

What You'll Learn
Optimal iPhone camera settings for real estate (including ProRAW)
Lighting techniques that make rooms look bigger and brighter
Composition rules that professional photographers use
How to elevate iPhone photos to DSLR quality with AI editing
Table of Contents
- 1. Why iPhone Photography Actually Works for Real Estate
- 2. Essential Camera Settings
- 3. Budget Equipment That Makes a Difference
- 4. Mastering Natural and Artificial Light
- 5. Composition Techniques for Every Room
- 6. Room-by-Room Shooting Guide
- 7. Editing: From Good to Professional
- 8. Common Mistakes to Avoid
Why iPhone Photography Actually Works for Real Estate
Let's address the elephant in the room: can you really compete with professional photographers using just an iPhone? The answer is a qualified yes—especially when you understand what makes real estate photos effective.
Modern iPhones (particularly iPhone 12 Pro and newer) feature:
- Ultra-wide lenses that capture entire rooms without distortion
- Computational photography that automatically balances exposure
- ProRAW format for maximum editing flexibility
- HDR processing that handles tricky window lighting
The truth is, 80% of what makes a great real estate photo happens before you press the shutter: preparation, lighting, and composition. The remaining 20%? That's where smart editing transforms good photos into scroll-stoppers.
The 80/20 Rule of Real Estate Photography
80% - Before You Shoot
- Room preparation & decluttering
- Natural light timing
- Camera position & angles
- Composition decisions
20% - After You Shoot
- Exposure & color correction
- Virtual staging empty rooms
- Sky replacement for exteriors
- Resolution enhancement
Essential Camera Settings
Before you shoot a single photo, configure your iPhone for optimal real estate results:
Basic Settings (All iPhones)
- Enable Grid Lines: Settings → Camera → Grid. This helps with composition and keeping vertical lines straight.
- Turn Off Live Photos: Tap the Live Photo icon until it shows "OFF." This saves storage and avoids accidental video capture.
- Use 0.5x (Ultra Wide): For most interior shots, the ultra-wide lens captures more of the room without the "fisheye" distortion of third-party wide-angle attachments.
- Lock Exposure & Focus: Tap and hold on your focal point until "AE/AF Lock" appears. This prevents the camera from re-adjusting mid-shoot.
Pro Settings (iPhone 12 Pro and Newer)
- Enable ProRAW: Settings → Camera → Formats → Apple ProRAW. This captures more data for better editing flexibility.
- Use 48MP Mode (iPhone 14 Pro+): Settings → Camera → Formats → Resolution Control → 48 MP. Higher resolution means better quality when cropping.
Camera Settings Screenshot
Budget Equipment That Makes a Difference
You don't need much, but a few inexpensive tools dramatically improve your results:
Essential Budget Kit (~$75 total)
Compact smartphone tripod with phone mount (~$25)
Eliminates shake, ensures level horizons, and lets you shoot in lower light
Bluetooth shutter remote (~$10)
Prevents camera shake when pressing the shutter button
Bubble level attachment or app (~$5-free)
Keeps your camera perfectly horizontal—crooked photos look amateur
Portable LED panel (~$35)
Fills in dark corners and balances mixed lighting
Skip the wide-angle lens attachments. They often create more distortion than they're worth, and modern iPhone ultra-wide lenses are optically superior.
Mastering Natural and Artificial Light
Lighting makes or breaks real estate photography. Here's how to work with what you have:
The Golden Hours
The best natural light for interiors occurs during "golden hour"—roughly 1-2 hours after sunrise or before sunset. During these times:
- Light is softer and more directional
- Windows don't blow out as easily
- Colors appear warmer and more inviting
For exterior shots, twilight (blue hour) creates the most dramatic, appealing images. The sky turns a rich blue, interior lights glow warmly, and the property looks magazine-worthy. Can't schedule a twilight shoot? AI twilight conversion can transform your daytime exteriors into stunning dusk photos.
Managing Mixed Lighting
The biggest challenge in real estate photography is balancing bright windows with darker interiors. Your iPhone's HDR mode helps, but here are additional techniques:
- Turn on ALL lights: Even during the day, interior lights add warmth and reduce contrast
- Open blinds and curtains: Let in maximum natural light
- Shoot toward natural light: Position yourself so windows are to your side, not directly behind your subject
- Use exposure compensation: Slide the sun icon down slightly to prevent window blow-out
Lighting Comparison Image
Composition Techniques for Every Room
Professional photographers follow consistent composition rules. Here's what works for real estate:
The Two-Wall Rule
Position yourself in a corner where you can see two walls (usually the back wall and one side wall). This creates depth and makes rooms feel larger than straight-on shots.
Shooting Height
Position your camera at chest height (approximately 4-5 feet). This shows both floor space and ceiling height while keeping vertical lines relatively straight. Avoid shooting from eye level or higher—it makes rooms look smaller.
The Rule of Thirds
Use the grid lines to place key elements (focal points, architectural features) along the intersection points. This creates more dynamic, interesting images than centering everything.
Leading Lines
Use natural lines in the space—flooring patterns, countertop edges, hallways—to draw the viewer's eye into the photo. This creates a sense of depth and invites exploration.
Keep Verticals Straight
Nothing screams "amateur" like tilted walls or converging vertical lines. Use the grid, use a level, and if needed, correct perspective in post-processing. Many MLS systems now reject photos with obvious distortion.
Room-by-Room Shooting Guide
Living Room / Great Room
- Shoot from corner positions to show maximum space
- Include architectural features (fireplace, built-ins) as focal points
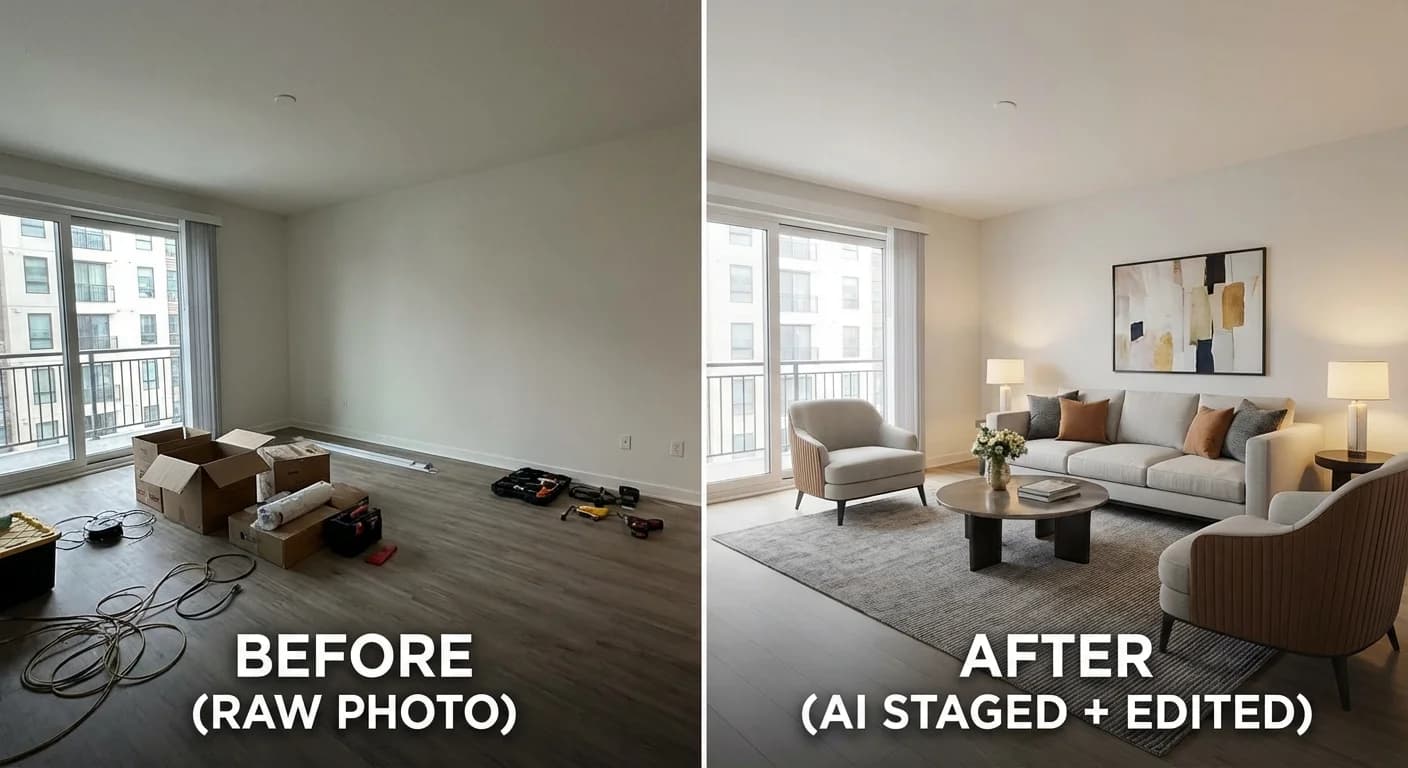
- If empty, consider virtual staging to help buyers visualize the space
Kitchen
- Capture the "work triangle" (sink, stove, refrigerator) in one shot
- Clear countertops of clutter except for strategic styling (fruit bowl, plant)
- Turn on under-cabinet lighting and range hood lights
- Open cabinet doors look cluttered—keep them closed
Bedrooms
- Make the bed the hero—ensure it's perfectly made
- Shoot from the doorway or opposite corner
- Remove personal items (family photos, medications)
- Empty bedrooms benefit dramatically from virtual staging
Bathrooms
- Put the toilet lid down—always
- Clear all personal products from counters and shower
- Shoot from doorway, including the vanity and shower/tub
- Turn on all lights; consider adding a portable LED for fill
Exterior / Curb Appeal
- Shoot at golden hour or twilight for best results
- Position yourself across the street for full property view
- Include some sky—it can be enhanced later if needed
- Move cars, trash cans, and toys out of frame
Editing: From Good to Professional
Here's where the magic happens. Even the best iPhone photos benefit from editing, and this is where you can truly bridge the gap between smartphone and professional quality.
Basic Edits (Do These Every Time)
- Straighten: Correct any horizon tilt and vertical convergence
- Exposure: Brighten shadows without blowing highlights
- White Balance: Correct color casts from artificial lighting
- Sharpness: Add subtle sharpening for clarity
- Crop: Remove distracting elements at frame edges
Advanced Editing with AI
While basic edits help, AI-powered editing tools can transform your iPhone photos into true professional-quality images. Here's what's possible:
AI Editing Capabilities
Virtual Staging
Transform empty rooms into beautifully furnished spaces. 355Lab's AI staging adds furniture, decor, and styling in seconds.
Twilight Conversion
Turn daytime exterior shots into stunning dusk photos with glowing windows and dramatic skies. No scheduling required.
Decluttering & Item Removal
Remove distracting objects, personal items, or temporary clutter without reshooting. AI identifies and removes items while preserving natural backgrounds.
Resolution Enhancement
Upscale iPhone photos to print-quality resolution for brochures, signage, and large-format displays without losing sharpness.
Common Mistakes to Avoid
Top 10 iPhone Photography Mistakes
Shooting vertically (always shoot horizontal)
Tilted horizons and converging verticals
Visible photographer reflection in mirrors
Toilet lids up in bathroom shots
Personal items visible (family photos, medications)
Shooting in harsh midday light
Including too much ceiling or floor
Forgetting to clean the lens before shooting
Over-editing with heavy HDR or saturation
Uploading low-resolution images to MLS
The Bottom Line
Your iPhone is a capable real estate photography tool—far more capable than most agents realize. The key is combining proper technique with smart editing.
Here's a realistic workflow:
- Prepare the property (lighting, staging, decluttering)
- Shoot during optimal lighting conditions with proper settings
- Capture more photos than you need (you can't go back)
- Select the best shots and perform basic edits
- Use AI tools for virtual staging, twilight conversion, or decluttering as needed
- Export at proper resolution for MLS requirements
The agents who master this workflow don't just save money on photography—they gain flexibility. You can shoot properties on your own schedule, quickly capture new listings, and still deliver professional-quality marketing materials.
Related Articles
How to Use Twilight Photography to Sell Homes Faster
Discover why twilight photos increase listing views by 61%
AI vs. Professional Photo Editing for Real Estate
Comprehensive comparison of AI and traditional editing approaches
Real Estate Photo Editing Pricing Guide (2025)
Complete cost breakdown for all editing services
Ultimate Guide to Virtual Staging (2025)
Everything you need to know about virtual staging